

Post-Storm Yard Damage: What to Document First
Quick Answer: Before a contractor arrives, take dated photos from fixed reference points, note which direction water moved and where it stood longest, flag pre-storm features still visible, and find older photos of the spot. This is what a contractor uses to scope it.
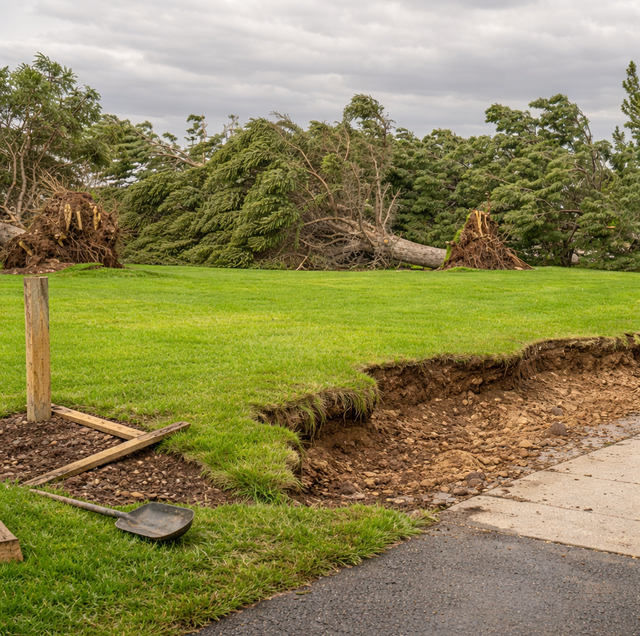
A hard storm can reshape a yard in an afternoon: a channel cut through what used to be lawn, a swale that no longer carries water anywhere, a patch of fill that simply isn't there anymore. The damage is obvious standing in it. What's not obvious, once a contractor actually walks the property, is how it happened: which direction the water came from, how deep the channel got at its worst point, whether that low spot is new or just newly visible. A contractor can eyeball the current shape of the yard in five minutes. What they can't do is see the storm. That's the gap a little documentation closes.
This isn't about building a case for anyone or proving what happened to an adjuster. It's simpler than that: a contractor who can see what the yard looked like before and what it looked like during scopes the regrade against the actual problem instead of guessing from what's left.
Move fast, since the evidence erodes too. Rain resets erosion patterns, mowing blurs channel edges, and foot traffic packs down soft ground within days. Treat the first 24 to 48 hours after the water recedes as the window to record this, before the yard starts healing itself and taking the clues with it.
Why The First Few Days Are What Matters
The shape a washed-out yard has right now isn't fixed. Soil that got saturated during the storm keeps settling for days, sometimes shrinking a channel's visible width even as its depth stays the same. A second rain event, even a modest one, can smooth over the sharp edges of an erosion cut or push more sediment into a low spot, masking how deep it got. A mowing pass or two softens the fine detail- the exact point where a channel started, the ragged edge where fill washed away- into something that just looks like "rough ground."
None of that erases the actual grade problem. It just erases the record of how the water behaved, which is the information a contractor needs most. If that behavior isn't captured while it's fresh, the contractor is left reconstructing it from static clues in dry ground, a much less reliable way to scope the same job.
Photograph From Fixed Reference Points, Not Random Angles
A photo of a gully by itself doesn't tell a contractor much. Is it eight inches deep or two feet? Without something stable in the frame, both scale and location have to be guessed at during the site visit, which defeats the purpose of taking the photo.
Pick two or three fixed points that won't move (a corner of the house, a fence post, a downspout, the edge of the driveway) and shoot every photo from the same spot relative to one of them. Stand at the same corner of the patio each time, angle the phone the same way, and get the reference object and the damage in the same frame. If you can, take one close-up photo for detail and one pulled back wide enough to show the reference point and the damage together. That pairing is what actually lets a contractor judge distance and depth from an image rather than from memory.
Photograph the same spot at the same time of day for the first few days if you can. Low morning or evening light throws shadows into a channel that make depth obvious; flat midday light can hide a real washout entirely.
Trace And Note The Direction Water Moved
A photo shows where the damage ended up. It doesn't show where the water came from or which way it was headed, and that direction matters more than the final resting spot does. A low point in the middle of a lawn often isn't where the grade actually fails; it's just where water from higher up ran out of downhill to go. A contractor who only sees the low spot may end up filling the symptom while the real failure point, upslope, goes untouched.
While it's fresh, walk the property and note, in writing or with a couple of quick phone-camera video clips, which direction the water was clearly running: away from a downspout, along a fence line, down a driveway and across the lawn, off a neighboring roofline. A rough sketch works fine for this: arrows on a hand-drawn outline of the yard, even scribbled on the back of an envelope, communicate more than a dozen photos of the aftermath.
Mark Where Water Pooled And How Long It Sat
Pooling and flowing are different problems, and how long a puddle lingers tells you which one you're looking at. Water that clears within a few hours is usually just slow-draining soil doing what slow-draining soil does after a heavy rain. Water that's still standing a day or more later, especially in a spot that wasn't wet before the storm, indicates an actual grade failure: a flat or backward-sloped area with nowhere for the water to go.
Note the pooling locations and, if you can check back, roughly how long each one held water. A phone note with a timestamp works: "still standing at 6 pm, gone by next morning" is a useful data point. That distinction changes what a contractor is actually solving for, since reshaping a flat spot to create fall is a different scope than reworking a slope after the surface soil itself has washed away.
Flag Pre-Storm Reference Features That Are Still Visible
If any part of the yard's old layout survived (an old fence line, a sprinkler head, the edge of a patio or driveway, a stake or timber edging piece that didn't wash away), those are the closest thing to a built-in measuring stick a contractor will get. A sprinkler head that used to sit flush with the surrounding turf and is now standing two inches proud tells you almost exactly how much soil washed away around it. A driveway edge that used to run level with the adjacent lawn and now sits four inches above it is doing the same job.
A tide gauge only means something because it's read against the same fixed piling every time; move it six inches, and the number stops telling you anything. Old fence posts, sprinkler heads, and hardscape edges work the same way: they're only useful as a baseline because they didn't move, so point them out to the contractor rather than letting them get graded over or mowed past without comment.
If the wash-out exposed or shifted a sprinkler line, low-voltage wire, or anything else buried, don't probe around it yourself. Call 811 to have utility and private lines marked before any digging starts, including the regrading work.
Save Any Older Photos Of The Same Area
If you have photos from before the storm (a listing photo from when the house was bought, a phone shot of a birthday party in the backyard, even a wide shot where the yard is just in the background), those are worth digging up. They won't be composed the way your post-storm photos are, but they can still confirm what the ground looked like where a low spot, a channel, or a bare patch now sits. A shot from eighteen months ago, compared against the yard now, gives a much clearer read on how much material actually moved than the current damage alone. A sprinkler-service photo, a fence-install photo, or an old real-estate listing photo can all do the same job.
What Not To Do Before The Contractor Arrives
Resist the urge to fill in a low spot or channel with whatever loose soil is lying around before it's been looked at. A quick patch job can bury the exact evidence (the depth, the shape, the point where a channel narrows or widens) that helps a contractor scope the repair. It's fine to rope off or flag an area so people and pets stay clear of soft or undermined ground, but leave the damage itself alone until it's been noted and walked. The same goes for mowing over a fresh channel to tidy up: a few days of rough-looking yard costs nothing, but mowing away the sharp edge of a channel costs the one piece of information that's hardest to reconstruct later.
Putting It Together Into Something Usable
None of this needs to be formal. A folder of dated photos on your phone, a couple of voice memos or notes about water direction and pooling times, and a mental (or literal) list of which old reference points are still visible is enough. What matters is that it's organized by date and location, so when the contractor walks the yard, you can point at a spot and say what it looked like an hour into the storm, a day after, and now. That sequence, not just the current condition, is what lets them diagnose the actual failure instead of guessing at what's left standing.
Frequently Asked Questions
Within the first 24 to 48 hours if at all possible, before another rain event or routine yard traffic changes the ground. If a second storm is forecast in that window, don't wait for it to clear: get what you can before it hits, and note the date and approximate time of the original damage in a phone memo, since a photo alone won't tell anyone when it happened.
Use a portable object instead: set a five-gallon bucket, a rake, or a lawn chair in the same spot for every photo, or lay a tape measure across the width of a channel before you shoot. Some phone camera apps also log a compass heading with each photo, a quick way to note which direction you were facing without writing it down separately.
Yes, use lightweight marking flags, the kind irrigation technicians use, pushed in just deep enough to stand up rather than driven in hard, since the ground nearby may already have shifted or exposed something. Different colored flags for different features (one color for a channel edge, another for a suspected buried line) make the layout easier to read at a glance when the contractor arrives.
Photograph where the line sits relative to the nearest valve box or zone, and if you can tell, note whether it's rigid PVC or flexible poly tubing, since a contractor may need to route grading work around it or arrange a temporary cap depending on which. Don't try to splice, bury, or reset it yourself; leave that part for whoever handles the irrigation repair.
A rough measurement helps. Use a tape measure or a straight stick marked at intervals and check depth at two or three points along the channel: the deepest section, the middle, and where it tapers off, rather than just one spot. Channels rarely run at a single consistent depth end to end, so a single number understates how the damage actually varies along their length.
Beyond photographing the channel itself, check the spill point, the spot where the swale used to empty out, whether that's a ditch, a street, or a lower part of the property. Wash-out debris or fresh erosion can block or reshape that outlet independently of the swale's main run, and a blocked spill point is a separate repair item from a reshaped channel, so flag it even if the blockage looks minor.
A little organization now saves a lot of back-and-forth later. The information that matters most- where the water came from, how long it sat, and what the ground used to look like- is exactly the information that fades first, so getting it down while it's fresh is worth the twenty minutes it takes.
Schedule a grading assessment — get an experienced eye on the washout and a scoped plan to regrade it correctly the first time. Polk Services LLC serves Lakeland, Highland City, and Mulberry. Call (863) 344-5806.
