

Swales, Berms, and Downspouts: One Connected System
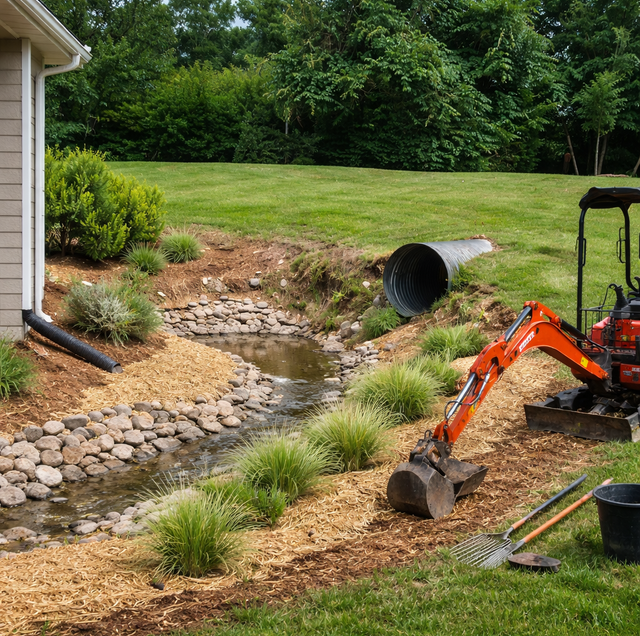
Quick Answer: Berms, swales, and downspout points aren't separate fixes; they're one system. The berm decides what water never gets in, the swale carries water already moving, and the downspout feeds into that path. Get the order wrong, and each piece undoes the others.
Three separate crews could build a berm, dig a swale, and extend a downspout on the same property in the same week and still leave the yard wetter than before. Not because any one piece was built badly, but because nobody decided how they were supposed to work together first. A berm redirects. A swale carries. A downspout injects. Treat them as three unrelated jobs, and you end up with a mound that dams water in the wrong spot, a ditch that goes nowhere, and a splash block dumping a few hundred gallons a storm right into the one place the other two can't move it.
One System, Three Different Jobs
Each element does something the other two can't. A berm is defensive: it keeps water that's approaching from one direction from ever crossing into the area behind it. A swale's job is transport: once water is already moving, it gives that water a planned, low-friction path to somewhere useful instead of letting it wander and find its own route (which is usually toward a foundation, a low corner, or a neighbor's yard). A downspout discharge point isn't a drainage feature at all in the shaping sense; it's a source. It's where a concentrated slug of water enters the system all at once, every time it rains hard enough to fill a gutter.
A design that treats those as one continuous flow, source to channel to barrier, holds up. A design in which each is placed on its own logic almost always fights itself somewhere.
Berms Decide What Water Never Gets In
A berm's whole value is that it stops water before it becomes a problem, so it has to sit uphill of whatever it's protecting, angled across the direction the water is actually traveling rather than parallel to it. Most residential berms run 12 to 18 inches high with side slopes graded around 3:1 or 4:1, gentle enough to mow and unlikely to slump after a heavy season. A berm that's too steep on the uphill face erodes at the toe within a year or two; one that's too shallow gets overtopped the first time a storm outperforms the forecast.
Before you break ground on a berm or swale of any real length, call 811 to get buried gas, power, water, and communication lines marked. A shallow cut can still hit a line installed higher than the original plan called for.
The other decision a berm makes is block versus redirect. A berm tied into existing high ground on both ends blocks water outright; nothing gets past it. A berm with one end left open, or curved back uphill at the terminus, redirects instead; it steers the flow along its face toward a swale or an approved outlet rather than trying to stop it cold. Open-ended berms are generally the safer call on a residential lot, since a fully blocked berm just relocates the standing-water problem to whatever's now uphill of it.
The Swale's Only Job Is to Keep Water Moving
A swale earns its keep on continuous fall, not depth. A wide, shallow channel with a steady grade of roughly 1 to 4 percent along its length moves more water more reliably than a narrow, deep one with a flat stretch in the middle. That flat stretch is where sediment drops out, grass gets choked, and the channel starts holding water instead of passing it through. A workable cross-section is broad relative to its depth, often something like an 8-to-1 or flatter width-to-depth ratio, so the channel reads as a shallow dish in the lawn (and stays mowable) rather than a ditch.
Where the swale ends matters as much as how it's shaped. A swale has to discharge somewhere that can actually absorb or convey the volume: an existing drainage way, a curb inlet, a retention area, or open ground with room to spread and soak in.
Running a swale to the property line and letting it dump onto a neighboring lot concentrates water where it didn't go before. Check with the local building or public works department before routing a swale's discharge toward another property.
Where a Downspout Discharge Point Belongs
A downspout discharge point is a design input, not an afterthought bolted on after the berm and swale are finished. Every gutter downspout on the house will dump a burst of water at exactly one spot every time it rains, and the grading system has to be designed to direct that burst to a spot where it can be handled. In practice, that means the discharge point should land at or very near the head of a swale, so the water it releases immediately joins a channel that's already sloped to carry it away, instead of landing on flat lawn and having to find its own path.
A discharge point set even a short distance from a swale's catch, on ground with no defined slope toward it, effectively creates its own miniature wet spot, no matter how well the swale itself is designed. If the physical distance between the two can't be closed with simple grading, a short section of solid (non-perforated) pipe run underground from the downspout to the swale head does the job cleanly and keeps the surface usable.
The Placement Mistake That Undoes the Whole Design
The failure that shows up most often once a berm and swale are already in the ground is a downspout discharge point left uphill of a berm, on the wrong side of the very barrier the design relies on. The berm does exactly what it was built to do: it holds the water back, except now the water it's holding back is water the house itself just injected. The discharge point recreates a pooling problem right against the base of the structure that was supposed to prevent one.
The fix isn't a bigger berm or a deeper swale. It's sequencing the layout correctly from the start: map where every downspout will discharge before deciding exactly where a berm's ends tie in. A downspout should never be upstream of a barrier it can't get past. If a berm has to run near a downspout for another reason, either route that downspout's discharge to the downhill side of the berm with a short pipe run, or open the berm's end near that point so it redirects rather than blocks.
Building the Sequence: How a Design Comes Together
A workable order looks like this, roughly in this sequence:
Read the existing high and low points first: walk the lot after a rain if you can, and note where water already sits or already runs, before deciding to add anything.
Place berms where water needs to be stopped or steered, not wherever there's spare fill: each berm's ends should tie into ground that's already higher, or curve back uphill, so the swale it feeds doesn't erode at that junction.
Route the swale from each berm's low opening to a real outlet; confirm the entire run has a continuous fall before digging a foot of it. A swale with even one flat or backward section will hold water rather than pass it.
Fit every downspout's discharge point into that path last: each one should land at a swale head or a point already inside the flow the berm and swale were built to handle, never on the upstream side of a barrier.
Building the swale channel and the adjacent berm from the same excavation is standard practice and cuts hauling: the soil dug out to shape the swale becomes the fill that builds the berm right beside it, since the two elements are usually sited next to each other anyway.
Materials That Make Each Piece Hold Up
A berm built from pure sand won't hold a shape through a wet season; it needs enough clay or compacted loam content to resist slumping, or a core of denser fill with a topsoil cap for the grass to establish in. A swale that will see regular flow benefits from sod rather than seed on the channel bottom for greater erosion resistance, with loose rock or riprap at the outlet point, where velocity is highest and bare soil would scour out fastest. Downspout discharge piping run underground to a swale head should be solid, not perforated, since the goal there is to move water to a point, not let it leak along the way.
None of this is a one-time build. A berm's grass cover, a swale's channel shape, and a discharge point's alignment all shift a little with every heavy season, sandy soil especially, since it moves more under running water than clay-heavy ground does, and both a dry stretch that lets grass thin out. A wet stretch that drives more volume through the system will find a design's weak point eventually. A quick seasonal walk-through, checking that the berm's crest is still intact, the swale still has a clean fall to its outlet, and no downspout is silently discharging on the wrong side of anything, catches most problems before the next storm turns them into standing water.
When the Layout Needs a Second Set of Eyes
A single berm and a short swale on an open, gently sloped lot is often something a homeowner can lay out with a level and a rented compactor. A lot with more than one structure, multiple downspouts, an existing slope that runs toward a neighbor, or a mix of driveway, patio, and lawn all draining toward the same low corner gets complicated fast, and a mistake in the sequencing (a berm placed before the downspout routes were mapped, a swale dug without checking where it actually discharges) is expensive to undo once the grass has grown in. Bringing in someone who lays out the whole system- berm, swale, and every discharge point- as one connected plan before any dirt moves is what actually prevents the "fixed one spot, flooded another" outcome.
Frequently Asked Questions
Yes, it's the standard approach rather than an exception, but the topsoil has to be stripped and set aside first, not mixed into the fill. Topsoil holds too much organic material to compact reliably, so a berm built with it stays soft and settles unevenly; the subsoil dug from the swale channel builds the berm's core, and the stockpiled topsoil goes back on as a cap once the shape is compacted, giving the grass something to root into without weakening the structure underneath it.
An erosion control blanket, typically a jute- or straw-fiber netting staked down over the seeded soil, holds the surface in place through the first several rains while roots establish, usually a two- to four-week window depending on temperature and rainfall. Sod skips that vulnerable window entirely but needs consistent watering to knot into the berm's fill rather than just sitting on top of it.
On a truly flat lot, the swale's job shifts from conveyance to storage: it terminates at an underground infiltration point, like a gravel-filled dry well or a below-grade chamber, rather than an open outlet, and the water is allowed to soak into the surrounding soil over a day or two instead of running off the property. This only works where the soil percolates reasonably well; heavy clay makes a dry well far less effective.
When a downspout sits too far from the nearest swale head to reach with simple surface grading, a shallow catch basin with a grated lid at the downspout's base collects the burst of water and feeds it into a solid underground pipe run to the swale, rather than relying on surface flow to find its way there across open lawn.
Spacing follows the size of the area draining into each berm, not a fixed distance. A berm sited to catch runoff from a small, contained area can sit close to the next one; a berm serving a wide catchment needs more room behind it to hold volume without overtopping, and stacking two berms too close together on a lot with a real drainage area behind them tends to overwhelm the lower one during a hard rain rather than sharing the load.
Once the area draining into a berm gets large enough, roughly a quarter acre or more feeding a single run, an undefined low point where the berm tapers down tends to erode into a random breach during a heavy storm. A built spillway, a rock-lined low section set at a deliberate elevation, gives the overflow a fixed, armored path rather than letting the berm fail wherever it is weakest.
Getting a berm, a swale, and a handful of downspout discharge points to act as one system usually comes down to the order decisions get made in, not the size of any single piece. Map the sources first, plan the channel second, and let the barriers close the gaps last, and the pieces reinforce each other instead of quietly canceling out.
Schedule a grading and drainage layout — get your berms and swales shaped, and your downspout discharge points planned into the same system, instead of three separate fixes. Polk Services LLC serves Lakeland, Highland City, and Mulberry. Call (863) 344-5806.
